Free shipping on orders over €199


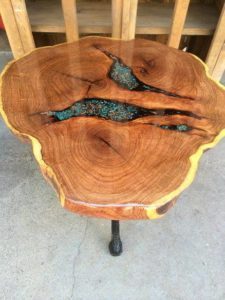
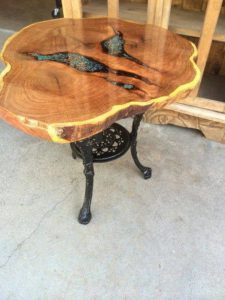
An old wooden trunk comes back to life thanks to resin and fluorescent pigment
There is a great passion for wooden and resin items of furniture
For the beginners or those who have never used resin and fluorescent pigment before, we have created a brief guide that we hope will give you some useful advice.
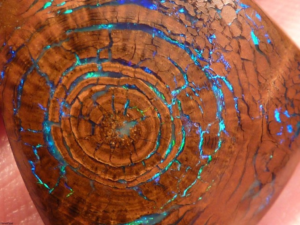
We already know that resin gives a “wet” and polished effect. By using in addition the fluorescent pigment, we will enhance wood imperfections, turning the wooden trunk into a modern and unique item.
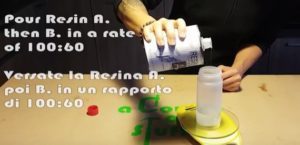
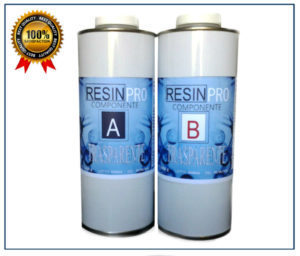
Resin preparation: we recommend to prepare 200-250 gr [0,44-0,55 lb] of resin for each sqm of the table surface; mix it carefully, following all the instructions included in the package. Once the resin is thoroughly mixed, leave it to rest (5 min) so that the air bubbles that appeared during the mixing procedure can rise.
Where to start?
The first step is to seal the surface of the wood, by applying the resin with a brush. In this way, all the holes (or defects) will be closed and when you will cast the resin it won’t leak out of the unsealed holes (if there are large cracks or openings, seal them with paper tape first). Wait around half a day for the resin to solidify and then get ready for the second step.
How to apply the resin on the trunk?
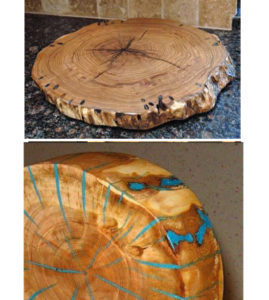
Start pouring the resin (using a plastic pot with spout) from the centre of the trunk. Since the edges of the trunk are usually irregular, pour it slowly and evenly over the surface. In this way it will be easier to achieve the so-called “mirror effect”.
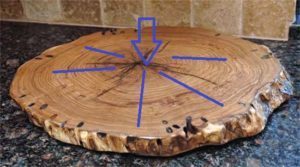
The edges are the hardest parts. Put a piece of cardboard or a nylon sheet (both is better) on the floor, then carefully pour the resin right on the corner of the edge, and keep pouring along the entire perimeter. After that, quickly spread the “streams” of resin on the sides of the table with a brush, so that it evenly soaks all the wood fibre. After this operation, check the surface to find imperfections (air bubbles).
We recommend to use a hair dryer (or rather a blow dryer) and direct it over the bubbles on the surface to make them burst. If the resin “sneaks” into any surface defects, apply an additional quantity over the defect. Repeat the operation, if necessary. After 24 hours, the table is ready, and you can assemble the legs.
How much resin do you need?
Let’s choose the amount of resin and the amount of fluorescent powder pigment you need!
In order to have a thickness of at least 1,5 mm [0,05”] and therefore achieve the self-levelling (mirror) effect, about 2 kg [4,40 lb] of resin/sqm are required (also according to the size of the holes to filled).
For example:
If you use a section of a circular trunk 60×60 cm [23,62”x23,62”], you will have an area of about 0.3 sqm (0.3×0.3×3.14). Then 2 kg [4,40 lb] X 0.3 sqm = about 700 gr [1,54 lb] of compound A + B (we suggest to use our “multipurpose” resin).
It is advisable to always take a few extra pounds of resin, rather than finding out afterwards that you need 100 gr [0,22 lb] more and that therefore the surface will not self-level. Consider it an investment, since you’ll be able to perform 2-3 extra tests to find the fluorescent pigment concentration you like. This leads to the second question:
How much fluorescent or phosphorescent powder should you buy?
It obviously depends on the size of the holes to be filled. The fluorescent pigment is very effective, therefore it requires a quantity of about 20%. So, if you have 1 kg [2,20 lb] of resin, you need 200 gr [0,44 lb] of pigment.
A trick to save pigment is to fill the larger holes with transparent resin first and then fill only the last few inches with the resin mixed with the pigment.

Before starting, we recommend to perform a little test in a plastic cup, until you achieve the desired fluorescent effect.
For example: 15 gr [0,03 lb] of epoxy component + 3 gr [0,006 lb] of fluorescent pigment powder. Once hardened and exposed to the sun, you can understand how to create this product. If you are not satisfied, try again with 15 gr [0,03 lb] of resin + 5 gr [0,011 lb] of pigment powder, until you achieve the desired fluorescence!
Golden Rule: if you don’t have that much experience with epoxy, perform a test on a small wooden board before applying it on a gorgeous piece of olive-wood or any other valuable wood cuttings, in order to gain experience and manual skills with the product.
Hopefully, these brief technical suggestions will help you avoid (or at least reduce) the major “setbacks” that may occur during this beautiful processing: don’t be discouraged if the first test is not perfect, the final result will improve more and more with every attempt.
Here’s an idea – add glitters or pieces of coloured glass: