 Free shipping on orders over €199


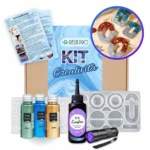
Creativity Kit: UV Resin Jewellery
 Available, ready for shipping
 Order now to receive your product between
Thursday 16 July
and
Tuesday 21 July.
Order now to receive your product between
Thursday 16 July
and
Tuesday 21 July.
 Shipping €13.90 - Free for orders over €199
€49,90
🌟 UV✨ Resin Jewellery Kit
Discover the world of UV resin: create unique and personalised jewellery with our complete💍 kit
Enter the amazing world of handcrafted jewellery with our UV Resin Jewellery Making Kit! 🌈 The kit provides you with everything you need to get started:
- 100 ml of high-quality UV resin;
- Alphabet-shaped silicone moulds
- a UV twist;
- a surprise set of 3 different Sahara;
- gloves and mixing tools;
- A step-by-step guide on how to make them.
Whether you want to create sparkly earrings or custom and stunning pendants, this kit offers endless possibilities for making small masterpieces!
Our creative ideas will inspire you to experiment: incorporate dried flowers or small leaves for a natural touch, create a marine effect with several layers of coloured resin, or mimic the look of gemstones.
Add sparkle to your pieces with our glitter and discover a world of creative possibilities. This kit is perfect for those who love DIY or are looking for a relaxing and fun activity. It is also an original gift idea for lovers of handmade 🎁 jewellery
Are you ready to create unique jewellery in a simple way? With your UV Resin Jewellery Kit you will be guided step by step by the creative team of Resin Pro, thanks to the guide included in the price!
Get inspired and create pieces of jewellery that tell your story 💖✨
Order now!
Description
Description
Step-by-Step Guide:
1. Lay out a plastic sheet or old newspapers to protect the work surface. Make sure your silicone moulds are clean and all materials are on hand. Don’t forget to wear gloves and follow the safety instructions.
2. Decide on the design you want to make using the moulds in the KIT. Consider the colours and decorations you’d like to incorporate into your pieces.
3. Start by pouring a 3mm layer of UV acrylic resin into the mould. You can add glitter or other decorative elements such as small stones to this layer. If you have dyes or resin pigments, you can add them directly to the resin inside the mould and then mix them using a toothpick or stick.
4. Use the UV flashlight to cure the UV-acrylic resin. Be sure to expose it to UV light for a sufficient amount of time for proper curing: 3-5 minutes.
5. Continue to layer the UV-acrylic resin, allowing each layer to fully harden by exposing it to the UV torch before adding the next layer. Repeat this process until the desired casting thickness is reached.
6. Once the resin pieces are fully cured, carefully unmould them. You will have beautiful multi-layered creations with glitter and unique designs.
Reviews
Reviews
COD:
KIT-UV
Creativity Kit: UV Resin Jewellery
€49,90
1