 Free shipping on orders over €199


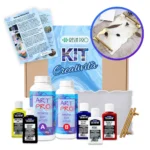
Creativity Kit: Resin Trays
 Available, ready for shipping
 Order now to receive your product between
Monday 06 July
and
Wednesday 08 July.
Order now to receive your product between
Monday 06 July
and
Wednesday 08 July.
 Shipping €13.90 - Free for orders over €199
€49,90
🎨 Resin Tray 🌈 Kit
Create Custom Epoxy Resin Trays: Start a Creative Journey to Beautify Your Home ✨
Bring a unique and original tray to life with our Kit! 🌟
We provide you with everything you need to get started:
- 830 grams of high-quality epoxy resin;
- a tray mould with handles;
- 5 resin-specific colours;
- gloves and mixing tools;
- A guide that tells you how to do it step by step.
Get inspired by some creative ideas or experiment with new effects: try the geode effect for a design inspired by the shapes of nature, create a tray in beautiful marine tones, incorporate dried flowers or add gold leaf for a touch of elegance.
Perfect as a gift idea or to show off in your home, resin trays are as simple to make as they are impressive 🎁
Are you ready to create a tray that is a real piece of design? All you need is a little creativity, we'll take care of the rest ✨
Order now!
Description
Description
Step-by-Step Guide:
1. Lay out a plastic sheet to protect the work surface. Make sure the silicone mould is clean and all materials are within reach. Don’t forget to wear disposable gloves and follow the safety instructions.
2. Mix the epoxy following the Art Pro 100:66 mixing ratio (by weight) – 180 g of A and 119 g of B – for a casting thickness of 5 mm. Weigh and mix both components thoroughly for 3 minutes, making sure all sides and bottom of the mixing container are encompassed for effective mixing. Let the mixture sit for 2-3 minutes.
3. Divide the resin into separate containers for each colour you intend to use. Add resin-specific dyes to each container to achieve the desired shades. Mix thoroughly.
4. Layer the colours into one large container without mixing them, allowing them to stack on top of each other. Pour this layered mixture into the mould for a dynamic, abstract effect. Alternatively, you can pour each colour into different places in the mould according to your design concept.
5. After 24 hours, you can unmould the resin tray. After another 12-24 hours (the resin reaches its full strength) you can make your tray functional, using the screws provided in the kit to secure the tray handles. Drill holes in the tray, then secure the handles with screws.
Reviews
Reviews
COD:
KIT-VASSOIO
Creativity Kit: Resin Trays
€49,90
1