 Free shipping on orders over €199


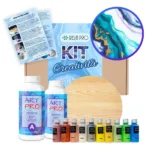
Creativity Kit: Resin PAINTINGS
 Available, ready for shipping
 Order now to receive your product between
Wednesday 22 July
and
Monday 27 July.
Order now to receive your product between
Wednesday 22 July
and
Monday 27 July.
 Shipping €13.90 - Free for orders over €199
€49,90
Epoxy 🌌 resin square kit
Create beautiful abstract artwork with resin! 🖌️
Discover our complete 🌈 kit. This is the opportunity you were looking for to approach the world of art in a simple and fun way!
The kit contains everything you need to get started:
- 830 grams of epoxy resin
- a wooden base with a diameter of 40 cm
- 10 mica powder colours
- Gloves and mixing tools
- In addition, we provide you with a step-by-step guide on how to make them.
It's the opportunity you were looking for to approach the art world in a simple and fun way! Every painting you make will be a statement of your personal style and creativity, perfect for decorating any room or as a special gift for someone close to you. 🎁
Are you ready to turn your artistic vision into reality? Get started now: you'll be surprised at how easy it is with our Kit✨
Order now!
Description
Description
Step-by-Step Guide:
1. Lay out a plastic sheet to protect the work surface. Make sure the wooden surface is clean and all materials are within reach. Don’t forget to wear disposable gloves and follow the safety instructions.
2. Place the wooden base on 4 objects of the same size, making sure that it is at a suitable height above the table (the top must be level). Be sure to check the flatness of this setup to prevent an excessive amount of resin from leaking over the edges. This precaution will help you get a perfect resin artwork from the first application.
3. Mix the epoxy resin following the 100:66 mixing ratio (by weight): 140 g of A and 92 g of B for a base of 40 cm in diameter. Weigh and mix both components thoroughly for 3 minutes, making sure all sides and bottom of the mixing container are encompassed for effective mixing. Let the mixture sit for 2-3 minutes.
4. Divide the resulting resin into separate containers for each colour you intend to use. Add the pigment powder to each container to achieve the desired shades – mix thoroughly.
5. Layer the colours into one large container without mixing them, allowing them to stack on top of each other. Pour this mixture in layers over the wooden base for a dynamic and abstract effect. Alternatively, you can pour each colour on different points of the base according to your design concept.
Next steps and more ideas!
6. Let the resin sit for 15-20 minutes to remove air bubbles. Use a small gas torch to gently sweep over the surface of the resin. This process will burst any air bubbles and help create a smoother surface. Leave your resin artwork undisturbed in a dust-free place for 24 to 48 hours.
Reviews
Reviews
COD:
KIT-QUADRI
Creativity Kit: Resin PAINTINGS
€49,90
1