 Free shipping on orders over €199


Creativity Kit: for Artisan Soaps
 Available, ready for shipping
 Order now to receive your product between
Monday 06 July
and
Wednesday 08 July.
Order now to receive your product between
Monday 06 July
and
Wednesday 08 July.
 Shipping €13.90 - Free for orders over €199
€49,90
Out of stock
🌈 Handcrafted soap 🧼 kit
Explore the pleasure of making soap at home! Create custom soap bars with our complete kit. 🛁
Learn how to make homemade soap bars in a simple and safe way. Add your creativity and you're done!🧼
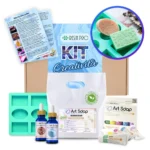
Our kit contains everything you need to get started:
- 1 kg soap base;
- a silicone mould for soap bars;
- 5 specific soap colours;
- 2 fragrances; gloves and mixing tools;
- A guide that explains how to make your own bars of soap.
With this kit, you can easily create two-tone soap bars, layered or with other original effects, adding a personal touch to your bathroom or creating unique gifts for your friends and family. 🎁
Get inspired by our creative ideas: try your hand at making rainbow soap bars, incorporate botanicals for an exfoliating touch, or experiment with colour gradients.
Enjoy moments of relaxation and fun with your loved ones: the kit is safe and also suitable for children😍
Turn an ordinary afternoon into a relaxing and stimulating activity for you and your family!
Order the Kit ✨
Description
Description
Step-by-Step Guide:
1. Lay out a plastic sheet or old newspapers to protect the work surface. Make sure the silicone mould is clean and all materials are within reach.
2. Cut the soap base into small pieces to dissolve them evenly. Place them in a microwave-safe container or place them in a saucepan in a double boiler to melt them. Gradually heat the soap base at short intervals to prevent overheating. Mix between intervals. If you have a soap thermometer, aim for a temperature of around 50°C. This will help prevent the soap from getting too hot and developing air bubbles.
3. Once the soap base is completely dissolved, add the fragrance. The amount of fragrance oil can vary, but it is generally recommended to add about 0.5-1.5% of the total weight of the soap base.
4. Divide the melted soap base into separate containers for each colour. The number of containers should match the number of colours you want to use. Add soap dyes to each container to achieve the desired colours. Mix well until the colour is evenly distributed.
5. Carefully pour the coloured soap into the silicone mould. You can create multi-coloured layers or solid-coloured soaps, depending on your preference.
Reviews
Reviews
COD:
KIT-SAPONE
Creativity Kit: for Artisan Soaps
€49,90
1